Online Ordering: How to Use The Clover POS Integration
When using our Clover POS integration for Online Ordering, your menu items from Clover will sync with the online store, the online order will print to your Clover POS system, either immediately or when prep is required, and your inventory will stay in sync between the two platforms. With order data in your Clover POS system, reporting is centralized and your team does not need to actively manage orders in the platform; they can be all managed from your Clover POS system.
Note: When setting up this integration, we recommend to turn off your store temporarily or going through these steps outside of your operating hours. Once you connect Clover, any Online Ordering menus previously set will disappear and your Clover menus will sync with the platform and the synced items from Clover will need to be added to newly created menus.
Setting Up Clover POS Integration in your account
To set up Clover POS Integration in the platform, there are a few prerequisites and several settings that must be configured in both Clover Hospitality by BentoBox and Clover.
Prerequisites
Below are the prerequisites required to enable and successfully use the Clover POS Integration.
Clover Hospitality by BentoBox
You must have an online ordering account setup
You must have the payments method setup & enabled
For initial setup, you must have your credentials to log into your account
(Optional) If you are using fees, you must have your fees set up in the platform
Clover
You must have a Clover POS system installed
You must have Clover's Restaurant Growth software plan that includes online ordering.
For initial setup, you must have your Clover POS system credentials to log into your Clover account
Clover Hospitality by BentoBox Fees Option
One major benefit that it offers is the ability to set up various fees based on the needs of the restaurant. These fees are optional in the platform and are not a requirement for Clover POS Integration.
IMPORTANT: please note that with Clover POS Integration and fee structure, both Flat and percent based fees are supported. Upon activating the integration, the fees from your platform will be created as a Fee and Item within the Clover dashboard. These items will not display on the actual online ordering site, but are necessary for processing the relevant fees across the two platforms. Please do not edit or remove them from within Clover.
Configuring Operation Hours and Prep Time (updated May 2023)
This is an important step to ensure your customers are able to successfully place orders leading up to, and at the end of, your desired operation hours. Clover Hospitality by BentoBox and Clover handle scheduled orders and the relationship with prep time differently. Integrated accounts should manage their service hours in the platform, which overrides hours set in Clover.
If you are using DoorDash delivery, you will need to set your service hours to account for the delivery time:
Store opens for business at 11 a.m. and assumes orders can be fulfilled at this time.
Prep time is set to 30 minutes in the store, and DoorDash delivery takes an additional 30 minutes.
Diners can begin placing orders for ASAP delivery fulfillment starting at 10 a.m.
Visit our Help Site to learn more about operation hours and prep time in the store
Visit the Clover Help Site for more details on setting up operational info within Clover
Scheduled Orders
Through the Clover POS Integration, the ability for a diner to schedule an order from your online ordering website is still possible, however you must have a specific setting in your Clover Online Ordering Hub. Scheduled orders must be set to 7 Calendar Days within your Clover Dashboard.
• Setting up scheduled orders in Clover
Log in to your Clover account
Select your desired Clover location for integration
Under the Accounts & Setup section, select Online Ordering, and then the Manage tab
Under Restaurant Information and Menu, select Operational information
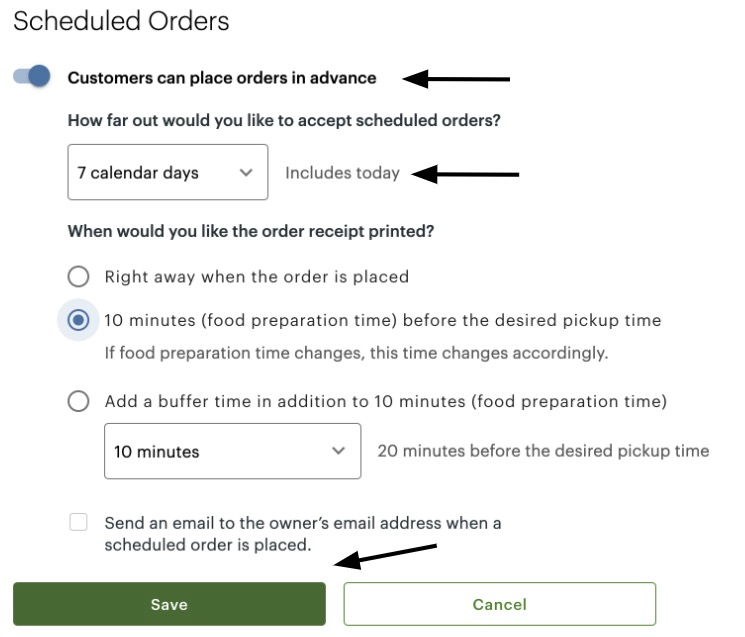
Under Scheduled Orders, press the Pencil icon to edit this section
Enable Customers can place orders in advance
In the dropdown How far out would you like to accept scheduled orders? select 7 calendar days
It is suggested that you select an option to print the ticket based on a food preparation time, however the rest of the settings are not required.
Press Save to lock in these settings
Clover Online Ordering Hub for Scheduled Orders setup
Connecting and Activating the Integration in Clover
Below are the steps required to connect your Clover POS system to your online ordering location(s):
Clover
Log in to your Clover account
Select your desired Clover location for integration
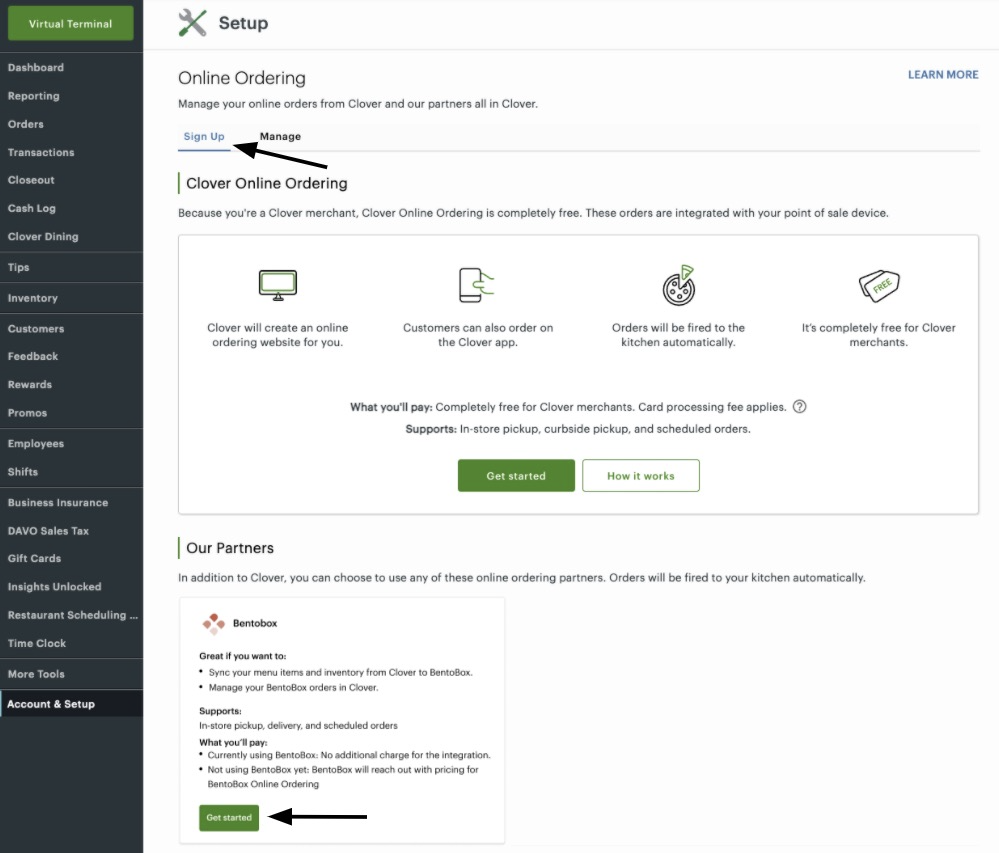
Under the Accounts & Setup section, select Online Ordering
Under the Sign Up tab, in the Our Partners section, click Get started on the partner tile
Clover Online Ordering Hub and selecting Clover Hospitality by BentoBox
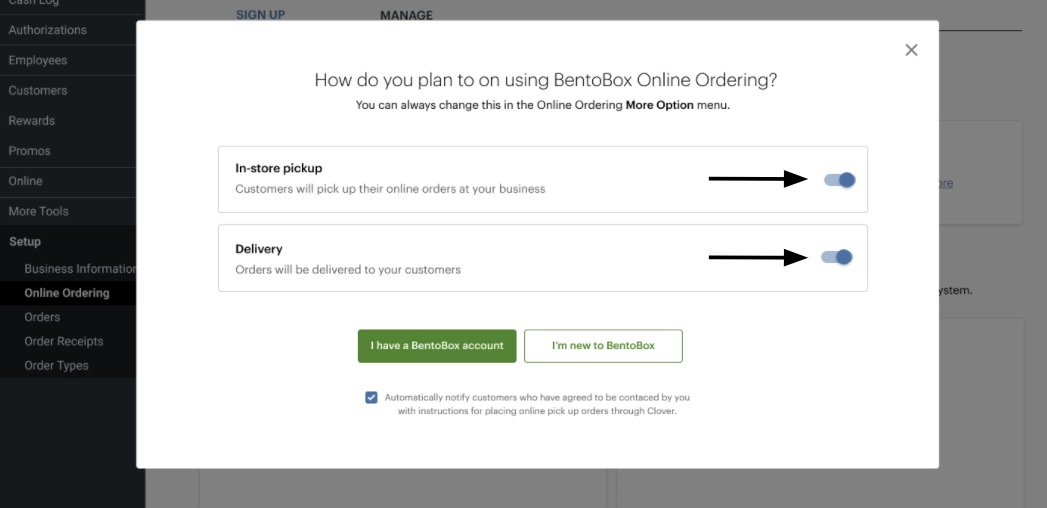
After clicking Get started, you will be presented with a series of Clover screens providing you insight into the benefits of the integration
On the How do you plan on using Online Ordering screen, it will offer you options to turn on In-store pickup or Delivery; enable these for your desired settings
Clover POS Integration enablement options for Clover Hospitality by BentoBox
Once you select I have an account the next screen will direct you to Connect your account. Press Connect and it will open a new tab for you to log in to your account. On the existing Clover tab, instructions are provided on how to navigate the connection.
Connecting and Activating the Integration in the backend
On the new website tab, log in to your account
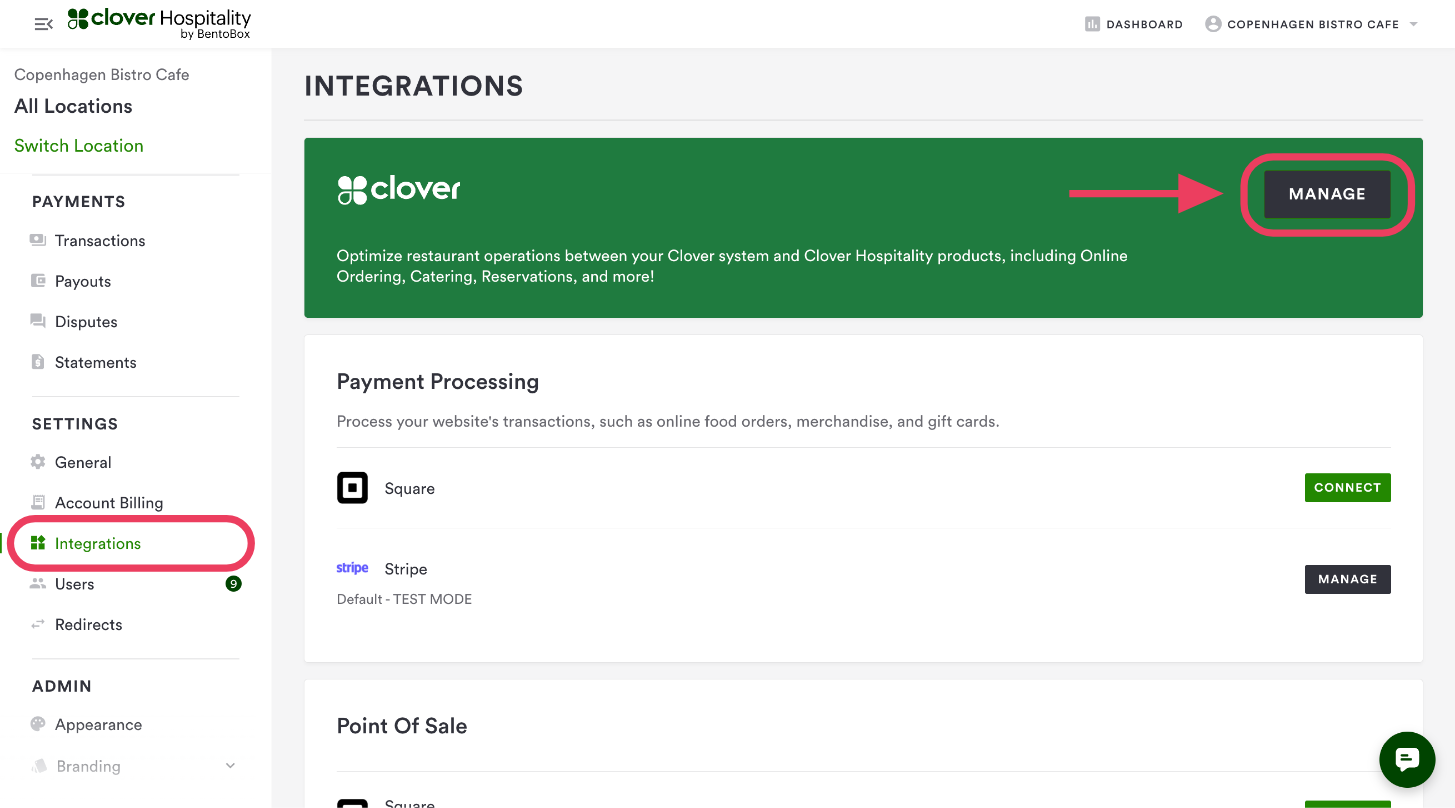
After logging in to the backend, navigate to SETTINGS > Integrations > Clover, and press Connect
From here, in the pop-up screen, use the dropdown menu to select the correct location that you wish to integrate with your Clover POS system
Online Ordering settings for Clover POS Integration
Once you select the location, press Connect Restaurant
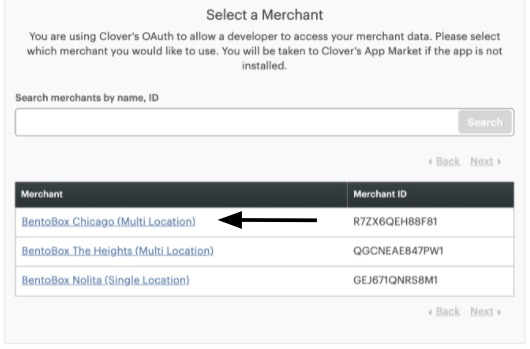
After pressing this, you will be redirected to select the corresponding Clover Merchant; click the link to make your selection (Note, this screen will display if you have more than 1 location to select from, otherwise, you'll be redirected to the Clover dashboard as seen below).
Clover “Select a Merchant” screen for BentoBox integration
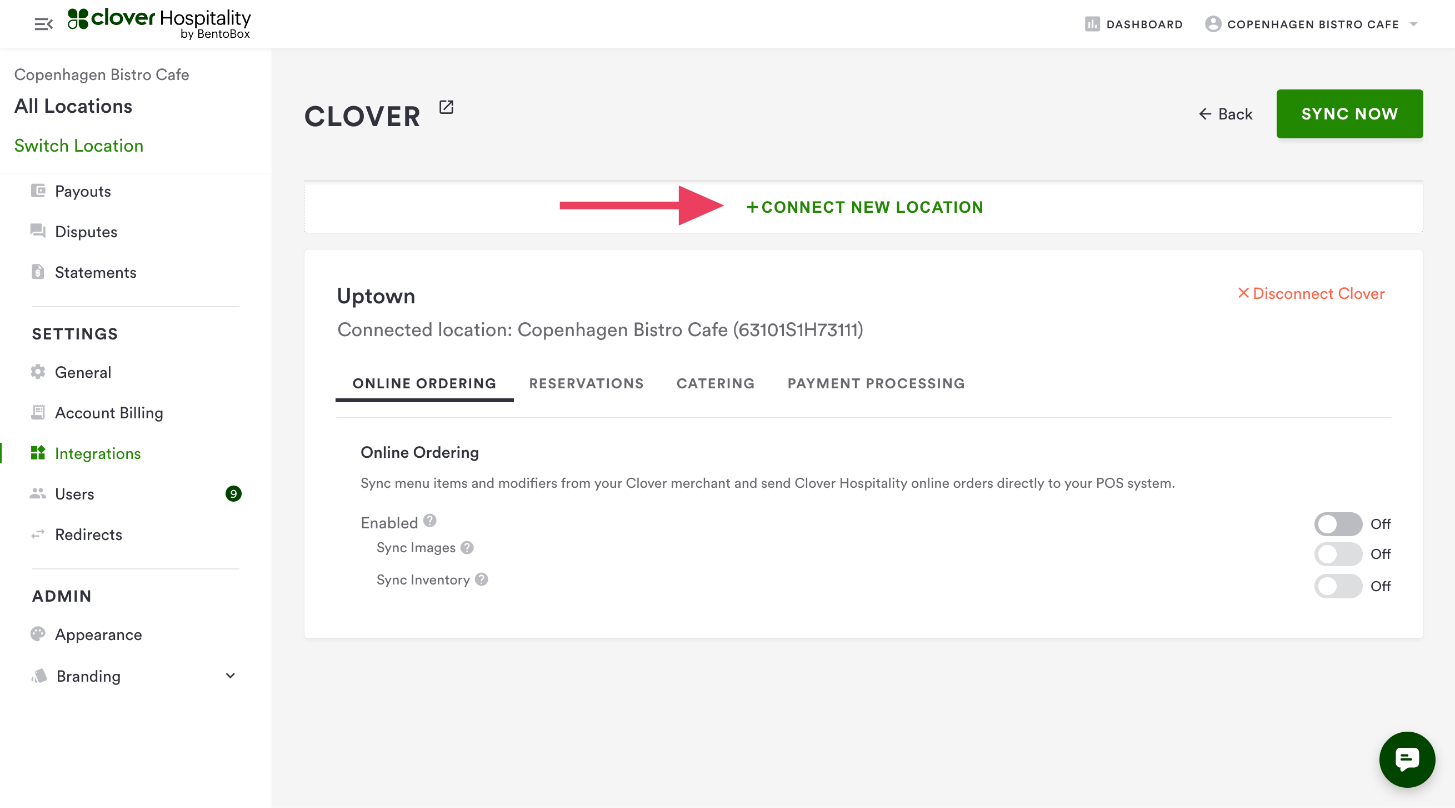
After clicking the correct Clover Merchant, you will be redirected back to the dashboard and to the Clover Manage Integration page. Press Enable to confirm final enablement of the online ordering integration.
Integration for Clover to activate the connection
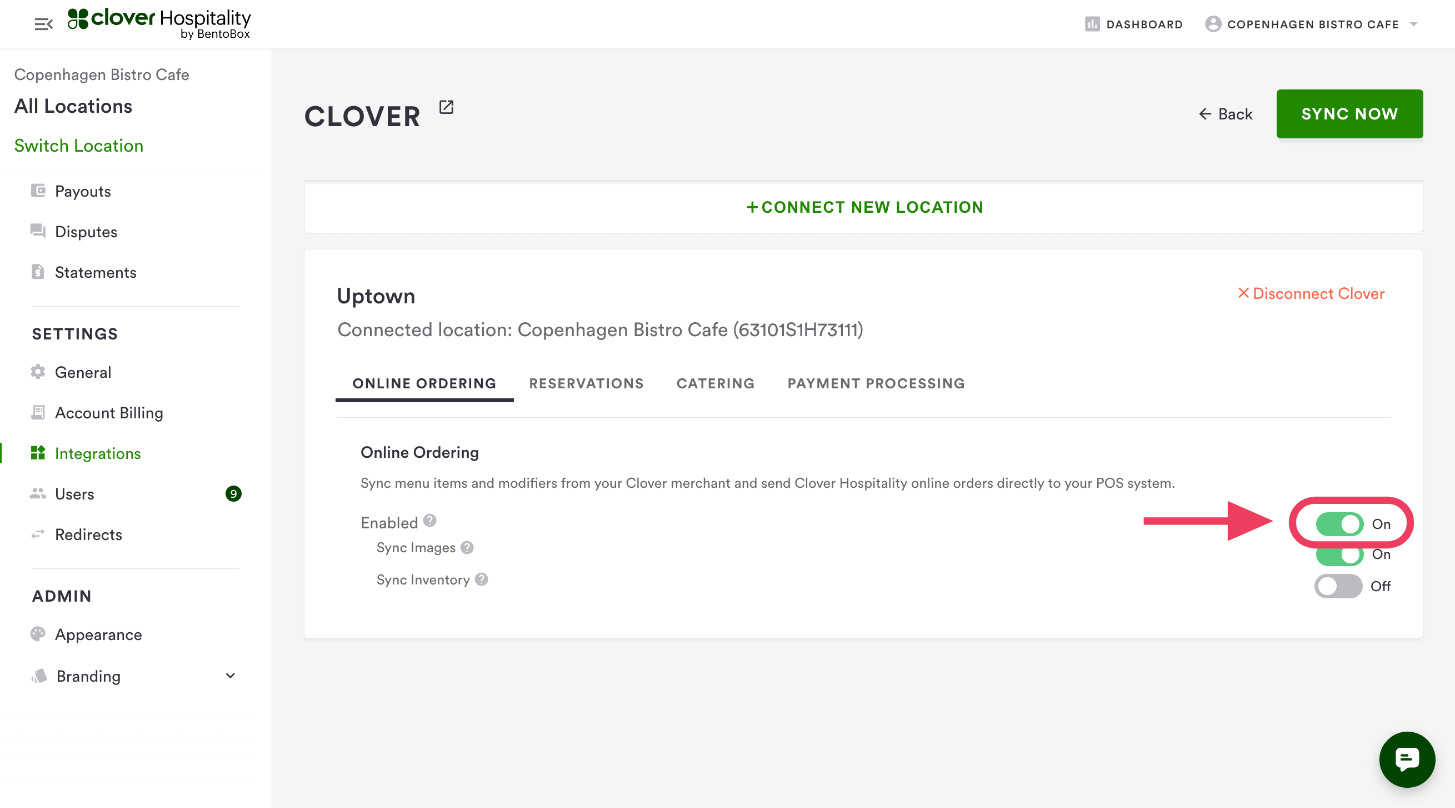
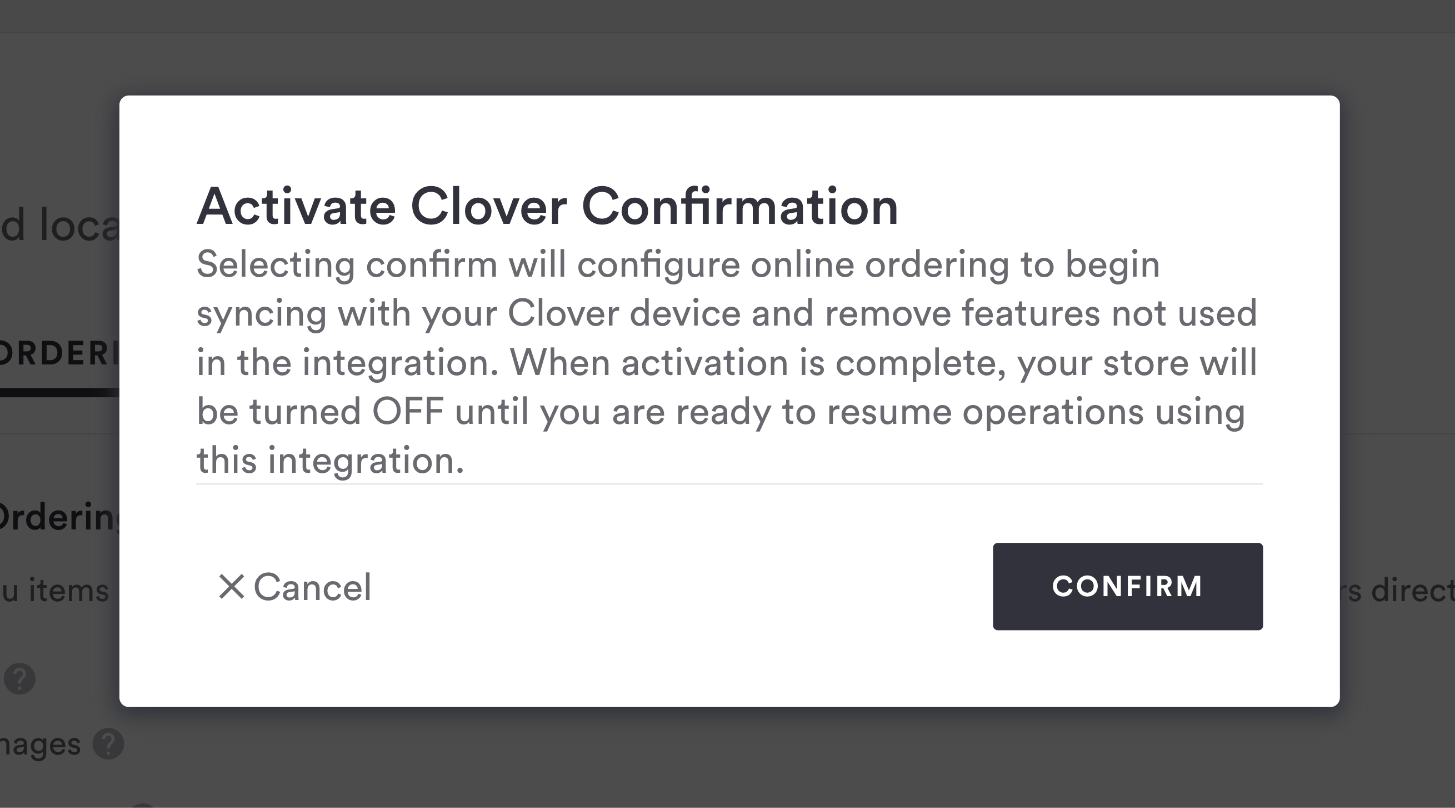
When you press the Enable toggle, a pop up screen will appear. On this screen you will see instructions on your store. Press Confirm to continue.
Integration for Clover to confirm the activation
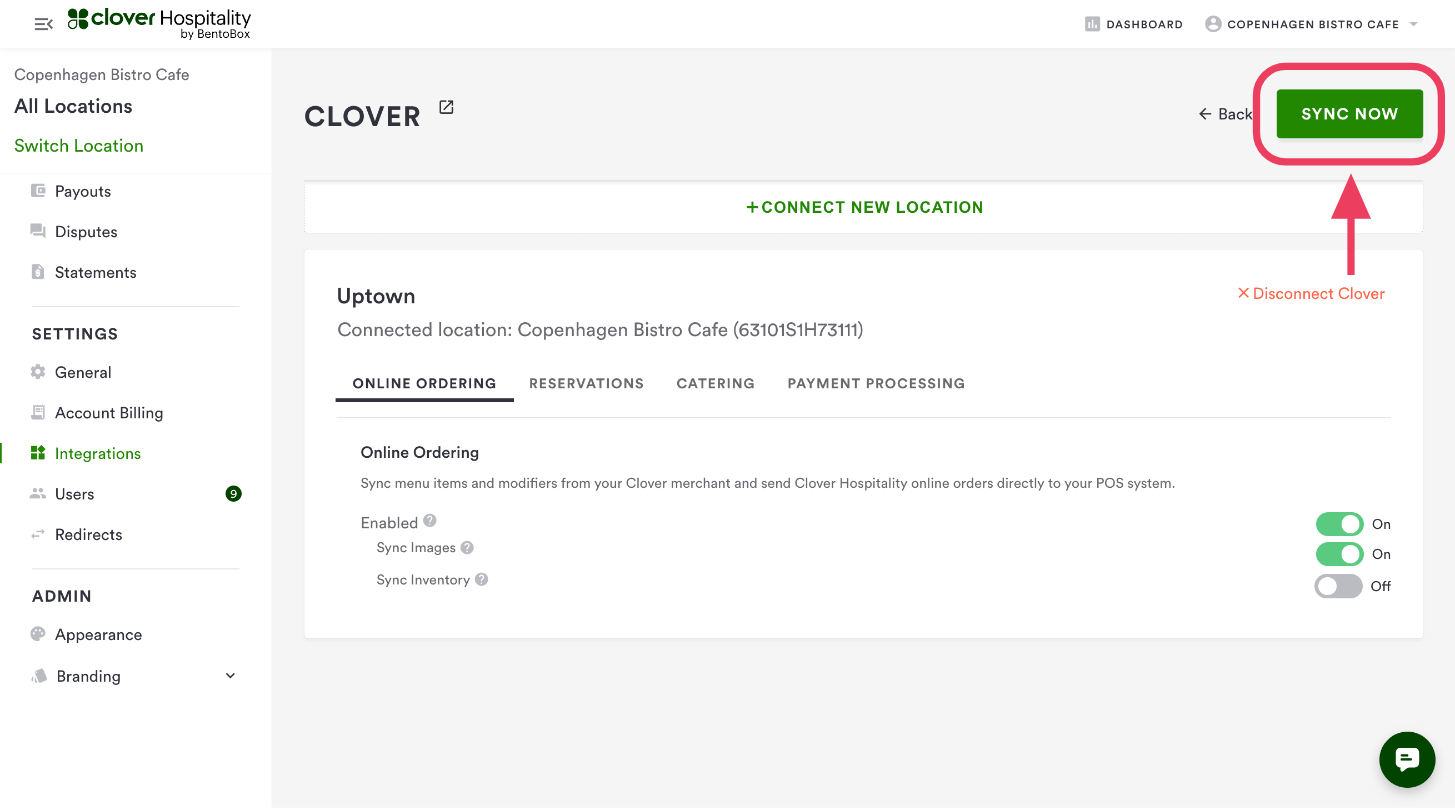
Lastly, press the Sync Now button and this will pull in any fees you set up in Clover.
Integration for Clover to Sync fees from Clover to the backend

Congratulations! At this point, your Clover POS Integration is activated and will begin importing various settings and menu items for you to set up your Online Ordering menus and website.
Verifying your Clover Online Ordering Settings In
As part of the Clover POS integration, it pulls various settings from your Clover Online Ordering Hub. For these settings, whenever you encounter those in the platform, the ability to edit those will be grayed out and in a read-only state. This is an indication that it can only be edited or adjusted from your Clover POS system and its various settings.
In general, for any help in your Clover POS, click here, to view the different options and settings.
Various settings pulled from your Clover POS system
Menu Items and Modifiers: listed under the Online Ordering section, Restaurant Information and Menu: Online menu in your Clover POS System By default, your standard menu items will pull over into this section, but Clover allows you to customize the items that will only be available for online ordering partners if you do not wish to pull over all items. In the platform, these will be viewed using various UI tags of the Clover location and the term POS.
Clover Hospitality by BentoBox partner fulfillment services: offered as In-store Pickup and Delivery. These will show up in your location settings under Store: Online Ordering, Manage Menus: Locations, edit the location mapped to your Clover POS system using the Pencil Icon, under Fulfillment Methods. You will notice these are grayed out and cannot be edited from the backend; these are only edited in the Clover Online Ordering Hub.
Default Order Prep Time: listed under the Online Ordering section, Restaurant Information and Menu: Operational Information section, under Food Preparation Time in your Clover POS system, and displayed in your platform under Store: Online Ordering, Manage Menus: Locations, edit the location mapped to your Clover POS system using the Pencil Icon, under Default Order Prep Time.
Fees setup as Items: As set up in the above section, these will sync with your settings during initial setup. These can be viewed under Store: Online Ordering, Manage Menus: Locations, edit the location you have mapped to your Clover POS system using the Pencil Icon, and scroll towards the bottom of the Edit Location screen.
Automated Menu Creation - Confirming your menu in Clover Hospitality by BentoBox
After you have set up the Clover POS Integration, a menu will be created and moved into your account based on your Clover Inventory Categories. Learn more about Clover Categories here.
Here is another help article that shows you how to set up your location with the settings you need to get your Online Ordering store back up and running.
Here’s How Automated Menu Creation works:
The Clover Automated Menu will be read-only, which means you cannot change it in the platform. It is designed to be managed from your Clover POS system and will stay in sync with your Clover POS. If you want to reorganize this menu, you can do so by adding, removing, reordering, or renaming your categories in your Clover POS. If you want to edit the details of the items, you can do this from the Clover POS Inventory Items section.
This menu can be used for your online ordering, just like any menu you already have. Make sure to assign it to the hours and fulfillment methods representing its corresponding location.
If you want to create additional menus in the system, you can do so by creating a new menu and starting from scratch or by cloning the new Clover POS Menu and using the clone as a template for another menu. However, the Automated Menu will be the only menu that stays in-sync with Clover. This allows you to create your own menus using the Automated Menu as a template, and allows for multiple menus.
Adding More Details to the data in your settings
In many instances, there are still some settings you can edit or tweak in your platform to add value to your online ordering website. These settings will remain editable in your account, allowing you to make changes, as needed.
Clover Hospitality by BentoBox encourages you to review all these settings, but below are some main settings that we highly recommend you edit, adjust, or tweak that will create and add value to you and your diners.
Photos attached to items: You can find instructions here, on how to attach photos
Descriptions to Items: For items, you can add an item description
Manually syncing Clover POS settings to your store
In some instances, changes to your operational settings and information in your Clover POS system will not alway sync up to (non-Menu items settings). In these instances, if you make what is considered an operational data change, you should perform a manual sync on the platform to verify you have the correct settings in your system.
How to Manually sync Clover POS data
Log in to your account
Navigate to SETTINGS > Integrations > Clover, and press Manage. From here you will press the SYNC NOW button, which will manually refresh all Clover settings.
POS settings to manually sync Clover POS data
Deactivate or Remove Connection to your Clover POS System
In the event you need to Deactivate or Remove Connection to your Clover POS Integration, you can do so in the platform. This does not affect your settings in Clover, and if you wish to remove Clover Hospitality by BentoBox as a partner in Clover, you must do so from your Clover POS system.
How to Deactivate the connection to your Clover POS System
By performing the Deactivate function, you will turn off the active connection between Clover Hospitality by BentoBox and Clover, but will maintain your Clover menu items, your POS merchant ID, and associated details, however you will no longer be able to see them or use them. Allowing this action, you can reactivate and enable the integration at a later time and will hide your non-POS details and display your POS details.
Log in to your account
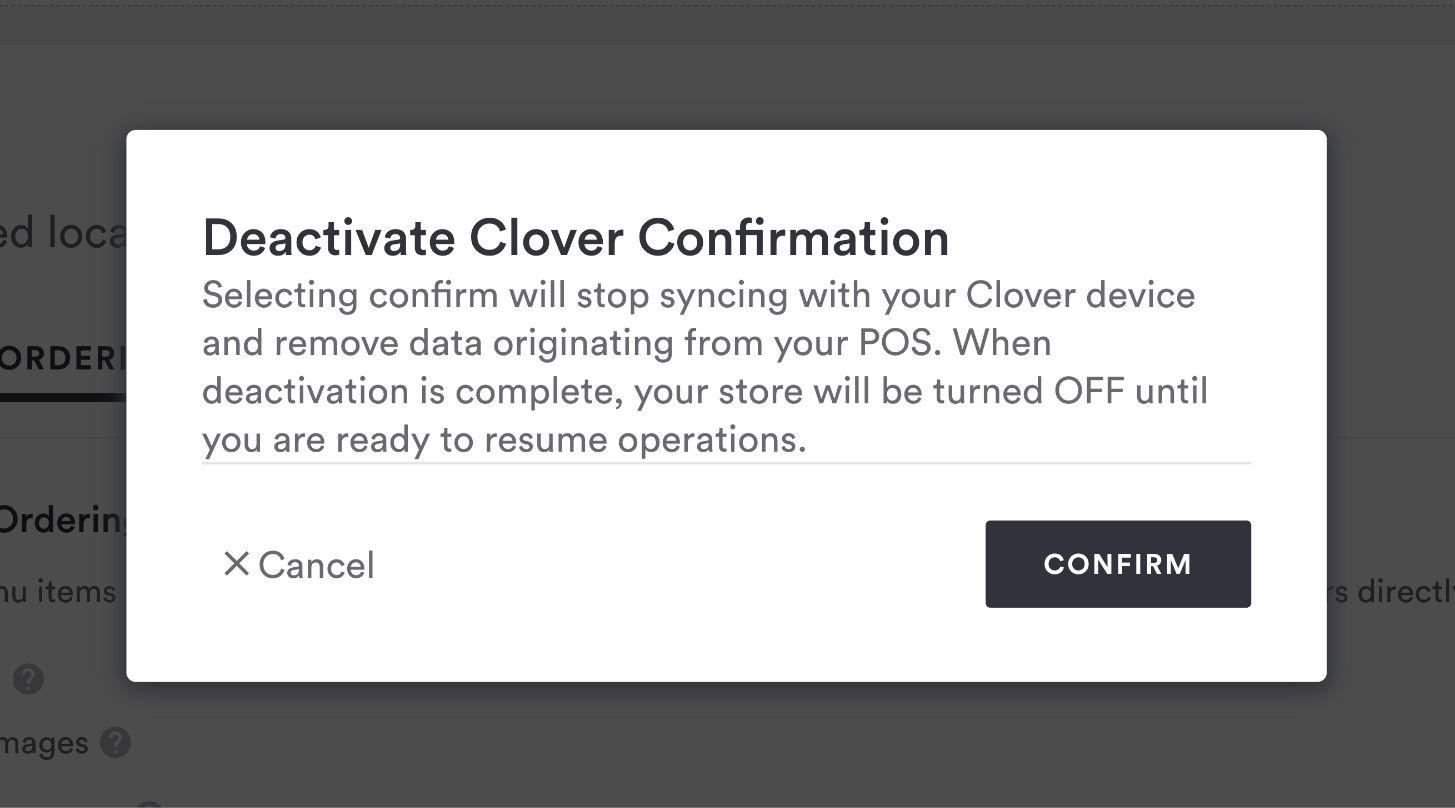
Navigate to SETTINGS > Integrations > Clover, and press Manage. From here you will press the DISABLE toggle
Press the CONFIRM button on the pop-up, confirming you wish to perform this action, which will leave the various data points, hiding them from display, and redisplay your previous manually created data (items, settings) and allow you to operate without a POS connection
POS settings to Deactivate Clover POS Integration
How to Remove Connection to your Clover POS System
By performing the Remove Connection function, you will turn off the Clover POS Integration entirely, deleting the data from the system. This no longer allows you to toggle data on and off and you must recreate the connection for your POS data to display in the platform.
Log in to your account
Navigate to SETTINGS > Integrations > Clover, and press Manage. From here you will press the Remove Connection link
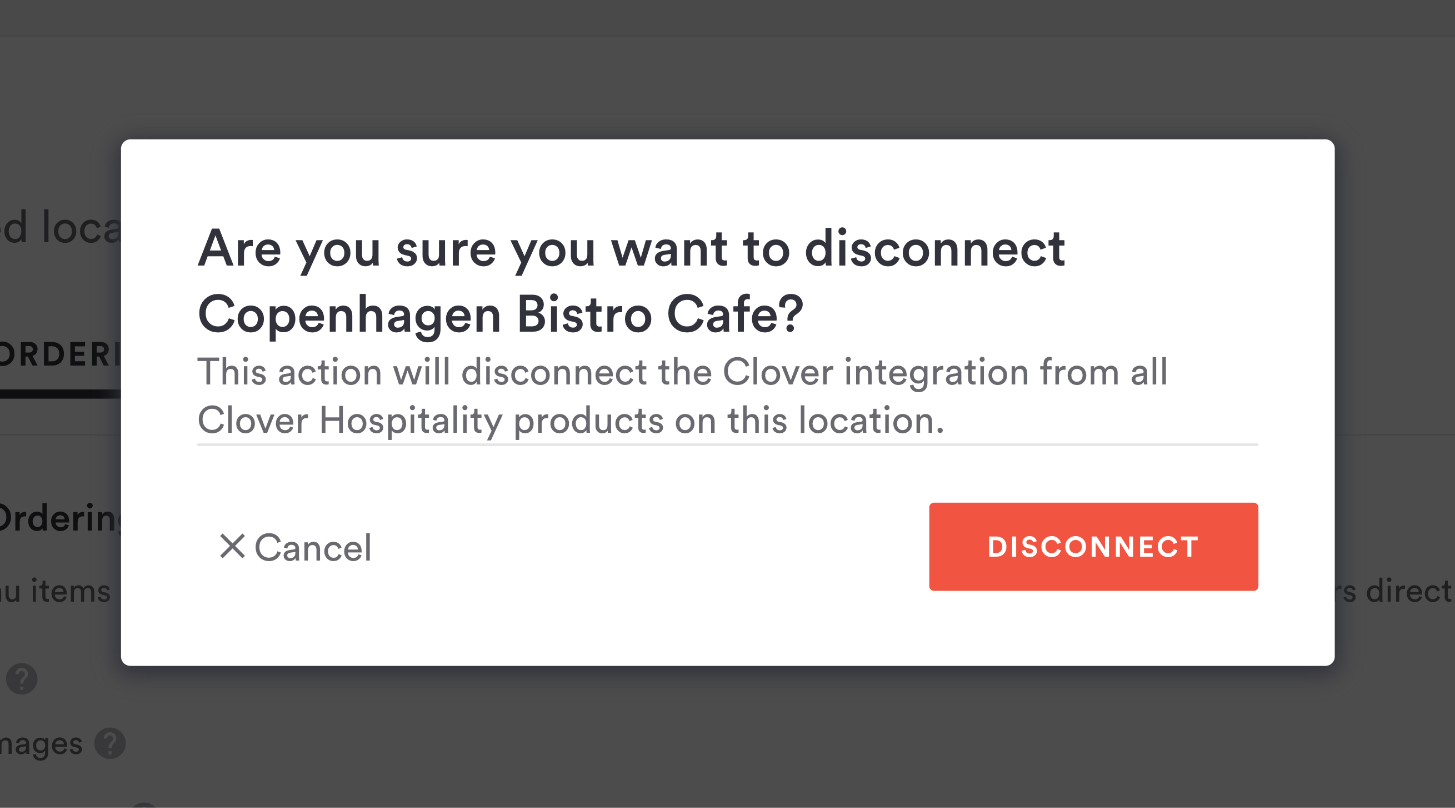
Press the DISCONNECT button on the pop-up, confirming you wish to perform this action, which will delete all POS related data, remove the associated merchant ID, and redisplay your previous manually created data (items, settings), putting you back in a completely un-integrated state
POS settings to Remove Connection for Clover POS Integration